I signed up for Another Limited Rebellion's Creative Sprint 30 day challenge for October 2015 to help with creative block; a malady I experience from time to time of varying lengths and intensities. Sometimes it helps to have limitations and boundaries in place to get your creativity flowing again. It sort of redirects the blockage. Also, as the web site states, creativity is a practice. Participants receive assignments via email every day for 30 days and are encouraged to post the results online. For further limitations, I've chosen insects as my theme (but of course!) and will update photos of the daily projects here in order to hold myself accountable.


This assignment gave me a panic at first. There was nothing in my pockets (not even lint!), and most days I don't carry a bag so my bags were empty. What could I make with that?! So I thought...my wallet counts for a bag. I opened the wallet...money! I had $7.96 and used every last penny (even the Canadian one) to make this flowering plum branch with three origami leaves being visited by an origami butterfly and cicada. This project forced me to learn how to fold new origami :)


Day 1
Make something that fits in the palm of your hand using only the materials in your immediate environment.

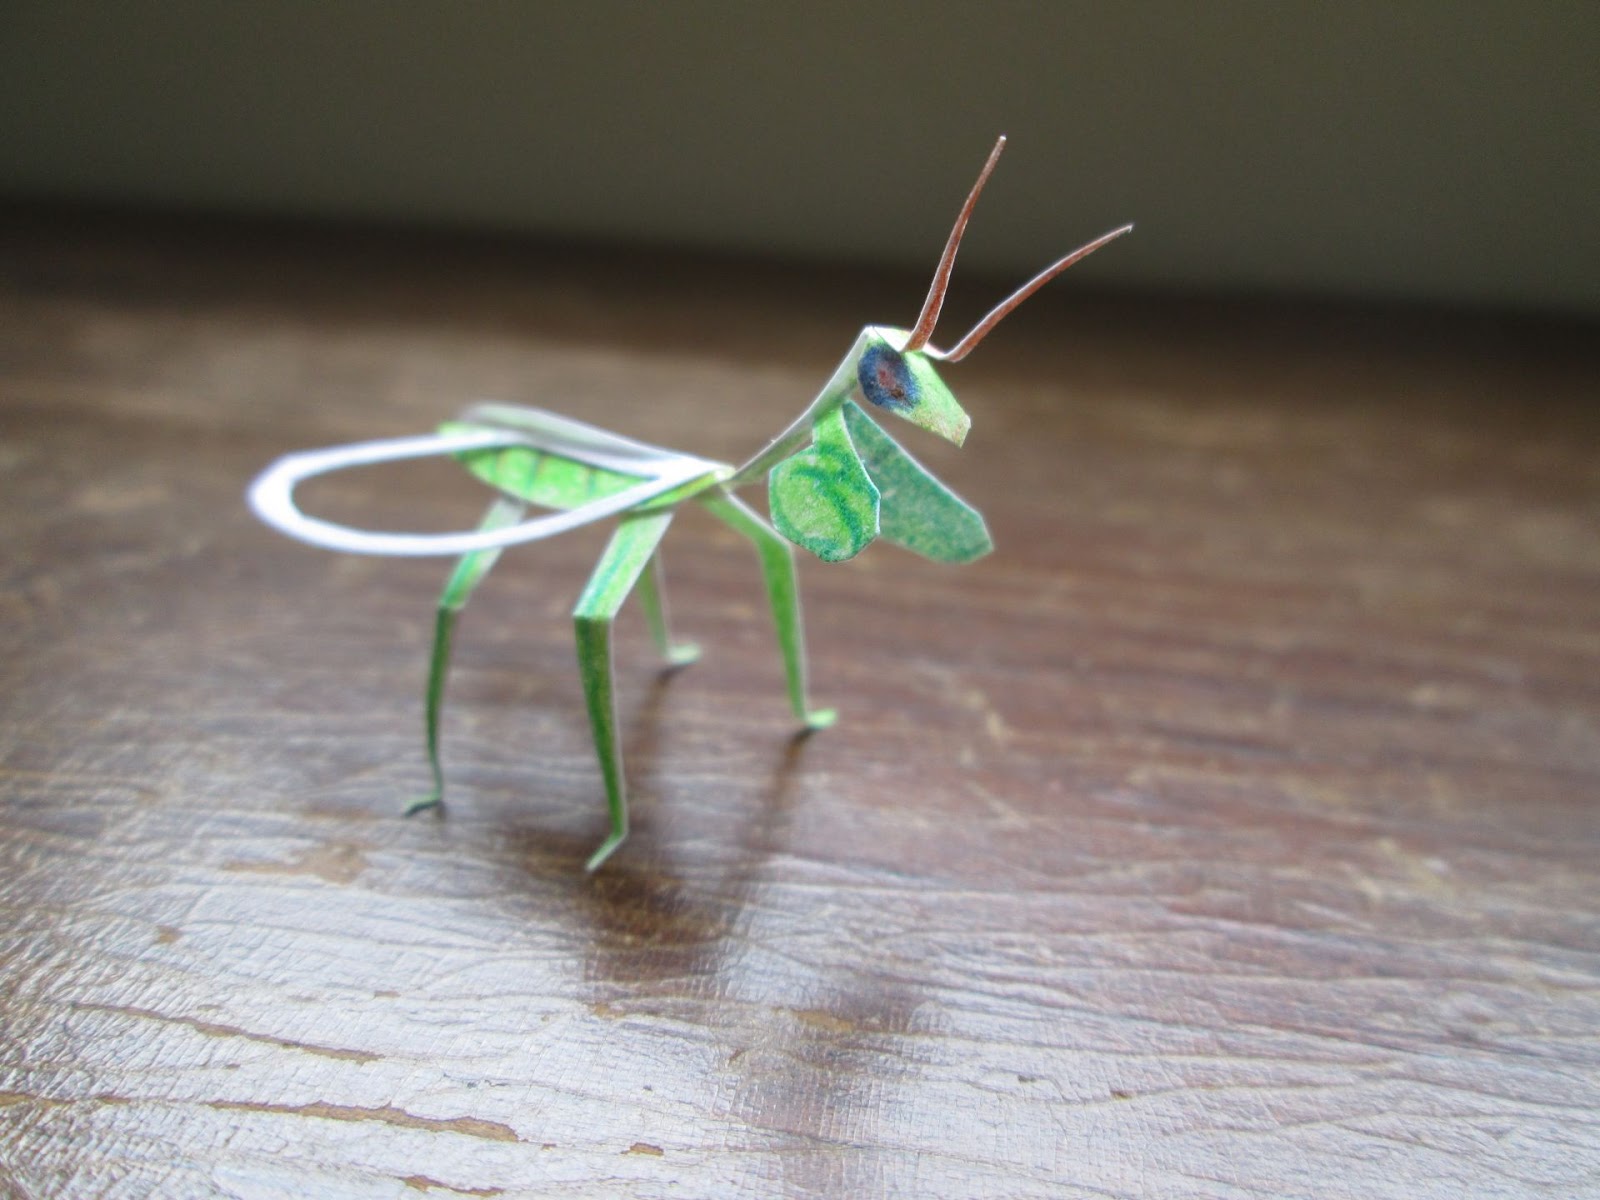
A mantispid made from items sitting on my desk: an index card and colored pencils;
cut out with scissors and an X-acto knife, and assembled with glue.
Side Bar: I need to clean my desk.


Day 2
Make something inspired by or using the letters of your first name (or your initials if you prefer).

Okay, squint a bit and you'll see it. It's a quick sketch of my initials, SAG, composed of a Snakefly, an Antlion, and a Green lacewing. Each of which also start with S-A-G and are all members of the order Neuroptera (as is the mantispid above). The green lacewing is laying eggs on the underside of a leaf because how else was I going to get a G shape out of it? It's a bit of stretch, but those Google doodles do it all the time.
Day 3
Give a face to something that normally doesn't have one.

I went for a walk in the woods to try and find inspiration for this one. In keeping with my bug theme, here is a mantis face on a grape leaf. Also wik: acorns, yellow-eyed grass flowers, a palmetto leaf tip, other grass species, and pine needle tips.
Side Bar: Many a mosquito got fed this morning.

I added a stick frame
Day 4
Make something with the contents of your pockets or bag.

This assignment gave me a panic at first. There was nothing in my pockets (not even lint!), and most days I don't carry a bag so my bags were empty. What could I make with that?! So I thought...my wallet counts for a bag. I opened the wallet...money! I had $7.96 and used every last penny (even the Canadian one) to make this flowering plum branch with three origami leaves being visited by an origami butterfly and cicada. This project forced me to learn how to fold new origami :)
Day 5
Make a container, something that can hold something else.

Incomplete!
I should have started this earlier in the day. My first thought when I read the prompt was "bowl" this logically lead to "candy bowl" because, well, maybe I wanted some Halloween candy. I had all this unused paper clay just sitting in my cabinet, and so I thought, perfect! I'll use that up!
This led to the unfinished Halloween candy dish above because there is no way this is going to dry before tomorrow. I want to paint a design on it. Is it cheating to take 2 days for one project?
10/6/2015:
It's still not dry!!
10/7/2015:
Finally Dry. Finally Finished.


The kissing bug (AKA blood-sucking conenose) was perfect for the decoration because they are already decked out in Halloween spirit, and, they're kinda creepy. They crawl into open, unscreened windows and feast on your blood at night while you're sleeping.
However, I feel like I missed the mark with this project:
1. I rushed the painting.
2. When I lifted the masking tape from the rim stripes, the paint lifted in some spots.
3. I think the point of this exercise was to make a container out of a less obvious material.
4. Most importantly, there's no candy!!
Day 6
Make something with your eyes closed.

Beetles and Grass
The point of this exercise was to let go of "preciousness," as the originator of this challenge states, "our need for getting things right." In seeking perfection we can miss creative and learning opportunities that only come from trying new things and making mistakes along the way. I blindfolded myself and drew this with colored pencils. Each time I felt "finished" with a color, I set it outside the box and chose another pencil. Interesting that this assignment should come the day after the candy dish that still cannot be finished. Did I learn any lessons here? Maybe.
Day 7
Make something inspired by a guilty pleasure.

This mixed media presentation is my homage to Linkin Park. They are terribly whiny, shouty, self-absorbed, and when I listen to them I think "Goodness! What dysfunctional relationships these guys have!" But if I'm in a foul mood it feels so great to belt out one of their songs in the car. My friend J once tried to convince me that Doritos had medicinal properties (junk food good for the soul?). This band is like medicinal Doritos. I printed out their first album cover (with a Buggin Park overlay....because, bugs!). I always thought the wings on this cover looked like dragonfly wings, so it easily fit into my insect theme. I gave the soldier a dragonfly head and an extra pair of arms. It involved some physical cutting and pasting and some work with a brown micron pen.
And this line's for the candy dish above, which I also finished today:
"I tried so hard, and got so far, and in the end, it doesn't even matter!"
Day 8
Recreate or interpret a work of art you admire.

This is based on a famous panel of the Choju Giga scroll (Animal Caricatures or Scrolls of Frolicking Animals) which was created sometime in the late 12th century in Japan. Similar to the original's ink on paper, mine was rendered in India ink and red acrylic ink on Bristol paper. I've replaced the rabbit with a click beetle trying to right itself, and the frogs were replaced with mantids (feeling ill today and my hand started cramping after I drew the beetle. The mantids aren't as well done as I would like. I may redo this sometime because I think it came out cute otherwise). The top "seal" in red says sumimasen, which is Japanese for excuse me! and the lower one is my name in Japanese. This was fun to make, but sketching with a brush is a lot harder than it looks, and no erasing! The Choju Giga artist was truly a master, I very much admire the brush work in the original.
Here is the original panel:

The work is often attributed to the monk Toba Sojo, but there is no way to verify its author. This scene is described as a sumo match.
Day 9
Break something and make something new with the parts.

Spider wasp in flight
This is made from kitchen tiles, a terracotta pot, grass, and palmetto xylem. My LL has a pile of construction leftovers I pilfered from since I recently purged my house of possible breakables:

Pilfering Grounds

The Chosen Ones

SAG SMASH!
Day 10
Make something inspired by your favorite childhood game.

The Mantis Sibs Play Super Mario Bros.
To be honest, I wasn't too into games when I was a kid. I had a lot of hobbies and just liked being outside. I did like to play tag, but couldn't think how to turn that into an art project. Just last week, however, speaking with friends and former colleagues, the topic of video games came up and I mentioned how I wished they'd bring back the original NES with all of its games already loaded. With fond memories of the old NES in mind, I created this scene whence mantid siblings, who ordinarily would eat each other, take a break from siblicide to play a nice video game, circa 1987.
Materials: A wood cardholder (bookcase), paper printouts (TV & other props), a tiny terracotta pot with paper plant, a real potted plant, a beaded wire mantis I bought on Etsy, the mantispid (pretend it's a mantis!) I made on the first day of this challenge, a box lid for the background, colored pencils, tape, glue, string.
All while making this, the following dialogue played out in my mind:


Ahh, Memories.
Day 11
Spill something and make something with or inspired by the mess.

Lady Kibble
I'm preparing to head to the airport and spend the next week in Phoenix, AZ. The cats were so kind as to provide the spill for me, in the form of all the rejected kibble lying outside their bowl. Additionally, there has been a ladybug hanging out in my house for the last few days, and I thought that seemed like something I could pull off with the limited amount of meat crunchies on the floor. I also took advantage of the white space on the floor for the ladybug's pronotum. So it's a green two-spot ladybug. Made of kibble. Mmmm.

Rejected Crunchies
Don't they know their prescription diet costs $45 a bag?!

I had a customer whilst creating.
Day 12
Choose any activity you normally do today and do it backwards.

This assignment was a bit of a head-scratcher. Isn't an activity I normally do an activity and not a creative project which can be photo-documented as we are encouraged to do? And can some of those activities even be done backwards? After my coffee, the first thing I was going to do was look for bugs in my Dad's yard. In order to be backwards about it, I first drew the above sketch of a tarantula hawk wasp about to attack a tarantula, then went outside and photographed bugs. Usually I will go out and photograph, and then come back and draw from the photos. See? Totally backwards.
So the drawing is what I wanted to see...instead I saw this:

Already dead!
I also saw a hawk wasp fly by, but it was far away and didn't land anywhere. Bummer.
I did get photos of other bugs which I will post later.
Day 13
Use the front page of a newspaper or cover of a magazine as materials or source of inspiration today.

Stargazing Stinkbug
My inspiration came from the following National Geographic cover which I happened to observe in a Safeway supermarket:
Materials: Paper, glue, watercolor paint, colored card stock, paper board, toothpicks, sharpie marker
There are two bug constellations in the sky, a grub on the left and a beetle on the right.

The additional toothpick is my Dad's contribution
(to be fair, he also suggested the extension on the tripod)
Day 14
Walk for five minutes without any specific destination in mind, make something with or inspired by whatever is available where you end up.

I didn't follow the prompt exactly. My Dad and I hiked to the base of Tom's Thumb today, so the destination wasn't totally unknown (though I've never been there before) and it definitely didn't take five minutes to get up there! This beetle is made from plant material I found at the top when we arrived at the base of Tom's Thumb. There's a seed pod husk, dried up grasses, tiny flowers, and a succulent leaf. This was a rush job.

The monolith in the middle is Tom's Thumb, we hiked all the way around it. This was taken about halfway up the mountain.
Day 15
Learn about something that happened today in history and make something inspired by it.

Rhinoceros Beetle Gong
I now realize I may have misread the prompt. I thought I had to merely learn about some piece of history and use that as inspiration, but I'm sure on this day 1,000 years ago, 500 years ago, or even last year, a gong was sounded. Oh well! On the 15th I went to the Musical Instrument Museum (MIM) in Phoenix and based my project on the many gongs in their collection. They had a display illustrating how gongs are traditionally made (i.e. - labor intensive), and I learned that there are generally three types of gongs (suspended gongs or tam-tams which are flat; bossed which have a raised center, are tuned, and sometimes suspended; and bowl gongs which are more like large bells). They originated in China, their first uses are thought to be as a signal for the workers to return from the fields since some gongs are loud enough to be heard within a five mile radius, and to clear the way for official processions. Shortly thereafter they were adopted by temple monks. Today they are still used in temples as well as Chinese opera, sumo matches, and as part of an orchestra among other uses.
Side Bar: I got to sound a suspended bossed gong and bowl gongs at the MIM. :)
Mini Rhinoceros Beetle Gong: Many of the suspended gongs I saw had elaborate carvings in their frames, dragons being very popular. I thought the aesthetics of the rhinoceros beetle fit in well as end-cap carvings on the top beam. This is made from a piece of plastic my Dad found in his yard (I used a rotary tool to carve the beetle shape), wood dowels and a metal washer that were lying around in the garage, a penny, string, whiteout, sharpie marker, and glue. The hammer is made from a hollow screw, toothpick, ink, and glue. The background is a ceramic tile that was lying in the garage and a piece of wood we've been using as a cutting board. My "Machinist" helped out by cutting and notching the wood dowels and drilling holes in the washer.
Day 16
Make something that combines two things that are not usually found together.

Darkling Beetle on Ice
1. The beetle was already dead.
2. Lest there be doubt, the beetle was already dead.
This is the first "ice sculpture" I've ever done. Included with the beetle (which had been lying dead on the porch for two days prior to my picking it up) are lantana flowers. Insects and ice do not usually mix, unless that insect be a weta.

Day 17
Teach us how to do something.

How to make a hardcover Japanese side-bound book
(with a beetle)

First, I made templates to make my life easier. Print out the following templates on 8.5 x 11" paper (standard letter size). When printed to scale, this template makes a 2.25 x 3.75" finished book. If it doesn't print right, send me a message and I will send you a PDF version.

To make re-usable templates, first glue (glue sticks work best for this) these to non-corrugated cardboard (paperboard, like that used for cereal boxes), cardstock, or manila folder, and then cut them out, preferably with an x-acto knife and metal ruler. The ones I use here are paperboard mounted. Alternatively, you can use the measurements to make your own.


Next, mark and cut out all of the pieces using the templates:

**This post is LONG - to see the rest of it click here.**


Day 18
Make something and trade it for something you want.

Incomplete!
Yep, I used paper clay again and it isn't dry. Hopefully it won't take two days like the Halloween dish. I'm already playing catch up from my day of travel.
10/20/15: Finished!

It's a domino cockroach, which is actually cute for a cockroach (believe it or not I have a cockroach phobia). Composed of paperclay, metal wires, a metal pinback, acrylic paint, and varnish. Tomorrow I will attempt to trade it at the botanical garden where I volunteer.


10/21/15: The Trade
The pin was traded for this sketch of yucca and grass by fellow garden volunteer L.

I requested a bug on the leaf.
Day 19
Make something for another #CreativeSprint-er.

Dishcloth Moth Pin
Since I'm not on Facebook, Twitter, or other social media, I don't know any other Creative Sprinters, but my dear friend Moth asked me about it this morning, so I'm making a moth for her.
Materials: a dishcloth, brown India ink, thread, glue, metal pinback

~11/2/2015 Update~
Moth has received the pin in the mail and sent me this photo of its new home
on her backpack next to Ms. Mouse:

Materials: a dishcloth, brown India ink, thread, glue, metal pinback

~11/2/2015 Update~
Moth has received the pin in the mail and sent me this photo of its new home
on her backpack next to Ms. Mouse:

They look quite pleased to have company.
Day 20
Find a creative way to give someone a compliment.

I sent this to my good friend LJ via email, to which she replied:
"HAHA...I love that! Such a helpful diagram!"
It was the only bug-related compliment I could think of (and LJ is the bee's knees). Then I got to thinking about how odd a phrase "bee's knees" is. This informative and entertaining website helps explain its origins.
Materials: textured cardstock, wing printouts, acrylic paint, glue.
Day 21
Make something and send it snail mail to someone.


"Just thought I'd send a note...to bug you on your birthday"
My Dad's birthday is October 22nd so I thought making a pop-up card to send him would kill two birds with one stone here. I'd been wanting to make a pop-up for a while now, but never got around to it. The front of the card contains a line drawing I did in India ink of the beetle that refused to die in my Dad's pool drain. The inside contains printouts (party hats included) of photos I took of bugs (and a scorpion) while I was in Phoenix. They were glued to cardstock and cut out with scissors and an x-acto knife. The background is a topographic map of somewhere in AZ. Also wik: art papers, parchment paper, jellyroll ink, string, glue.
This isn't a perfect pop-up, ideally the scorpion and beetle should have been glued to the bottom with tabs (for better opening/closing functionality), but they look better this way!


Day 22
Make a Mustache and get a picture of yourself wearing it in public.

No, I try to limit the number of photos of myself online to as few as possible. Luckily, Senor Crickor stepped in for me to keep with my bug theme.

Senor Crickor poses with his mustachio-on-a-stick

Senor Crickor takes a selfie

Senor Crickor without all the embarrassing accoutrements
SC is made of paper clay, metal wires, and acrylic paint. His accessories are paper and wire. And yes, that's tape I used to make him hold onto his things, no need to point that out.
Special note: I am indebted to LJ for the word "crickor."
I can now no longer think of crickets without thinking...crickor!
Day 23
Go outside and make a shrine to nature - leave it for someone to find.

Bugaku Bodhisattva Shrine
Umm, yes, this is the bodhisattva dedicated to imperial court dance of the insect world; the shrine being located on a spanish moss-laden oak tree (bugaku are traditional imperial court dances in Japan, I couldn't resist the bug pun). It kind of looks like a scarab beetle, so let's go with that. Hurrah Nature!

One tarsus holds a "sacred branch" (dead fern leaflet), one holds a "sacred fan" (piece of lichen), the middle pair of tarsi are clasped in an inscrutable mudra. The legs are crossed in front. What better animal representative for a bodhisattva than an insect? (Ok, perhaps a spider...octopus...centipede...nevermind).
This was created in the Econ River Wilderness Area since I had plans to visit it today anyhow. It did not get left behind for anyone, however, because of the recent upsets caused by the overuse of cairns (as trail markers and as "art" left behind). Besides making trail markings confusing, the argument is that places like the Econ Wilderness are there for people to get away from people, and this includes acts of human "whimsy". I respect this opinion and returned my shrine materials to the forest floor from whence they came.
Materials: pine cone, sticks, moss, lichens, acorn top (it's wearing a hat which is difficult to see in the photos), tillandsia (spanish moss), palmetto leaf, fern leaflet, natural twine.
Everything was already on the ground. I brought the twine and it returned with me.
Day 24
Break a Rule.

This broke two rules:
1. Color inside the lines.
2. I hate yellow.
This watercolor painting is based on a bee fly photo I took in AZ. I don't know what species the flower is - it kinda looks like a tassel flower. I have to admit, the first few brush strokes made me very nervous, but then it was quite liberating putting paint where I normally would not. My strokes were freer, less confined, less controlled. Fun!
Day 25
Make whatever you want but do it in a public place...get someone to take a photo of you making it.

I went to the Maitland Farmers Market and completed this colored pencil drawing on a bench in front of Lake Lily. This of course was inspired by American Gothic (appropriate!). Husband and wife are a tiger beetle and mantis. I think they were attracted to each other's predatory instincts.
"My! How vicious you are!"
"Not as vicious as you, my lovely! ...didn't you eat your last husband?"

This creative challenge is determined I will post pictures of myself online. So here I am scribbling diligently. My friend E's dog Stella is in the foreground. You can't hear it but we were treated to some modern renditions on synthesizer in the background.

Complete!
Day 26
Create a frame using any materials. Take it with you wherever you go and use it to capture anything you view as beautiful.

Zinnia in the Dirt Patch
My frame is made from cardboard, cardstock, gold ink, and glue. The insects are ebony jewelwing damselflies.

Sweetwater Park, Oviedo

Oviedo Chickens at the Library

Creek where it meets Lake Mills

A couple of my neighbors

Econlockhatchee River - the backyard

Small fern - in the backyard

Maceo not cooperating ("WTH is this??")

That'll do, cat, that'll do.
Day 27
Make something with another #CreativeSprint-er.

Snout Butterfly on a Snout
Since I don't know any other CreativeSprinters my friend LJ helped me out with this collaboration. She has nagged me since I can remember to make stuff with butterflies, which I stubbornly refuse to do for snobbish (and hypocritical she points out) reasons. So here's how this butterfly project came to be (through the magic of texts and teamwork):
SAG: Think of Bug things. What comes to mind?
LJ: >:3
LJ: Butterflies.
SAG: Somehow I knew that was coming.
LJ: Hahahahaha
LJ: Specifically a butterfly standing on a long piece of grass with its wings closed.
SAG: I’ll have you know there are already two butterflies featured in this project. One is an origami dollar & the 2nd is in a pop up card.
SAG: [back to the project at hand] 2d? 3d? Is it doing anything silly?
LJ: Make the antenna cute because that’s my favorite part.
LJ: (I feel so demanding)
SAG: Of course. I got pics of a snout butterfly in AZ. Ever seen one?
LJ: No! I’m gonna google it
LJ: SO FLUFFY
SAG: Well I’m demanding of you now, too. I will make a butterfly but I want it to be an unusual circumstance. Think! >:3 (I love that face)
LJ: How about a paper butterfly on a real piece of grass?
SAG: Maybe…
LJ: Does your camera have a timer? Because you lying on your stomach admiring the butterfly in the background would be super cute
LJ: Like fuzzy person in the background, paper butterfly in the foreground
SAG: Not gonna happen! Haha!
LJ: Or on a cat’s nose
LJ: Also super cute
SAG: Oh, they’d eat it before I could take a pic
SAG: Which ones?
LJ: The snout ones
LJ: Snout butterfly on a snout!
SAG: Hahahaha! Yes, but whose? The cats are not likely to cooperate ;)
LJ: Or you could draw it on one, I’d take that, too
LJ: Those old dogs [my LL’s] would they sleep through it?
SAG: They won’t cooperate either. One of them regularly growls at me when I approach the door. The other (I swear it was purposely) took a [expletive] right outside my open window. I’d entered her territory earlier in the day. She never did that before!
LJ: What awful dogs
SAG: Maybe I could turn a pic of my cat (photo) into (sort of) 3d & put a paper snout butterfly on the nose.
LJ: Ooooo!
LJ: That’s VERY fancy
SAG: Haha! Ok, so we’re going with a snout butterfly on ‘pop up’ snout of a cat?
LJ: I’m for it!
SAG: Alrighty! I may have to use an online kitty, I don’t think I have a good photo for this.
Thus, the world has become a better place all because of collaboration.
Materials: paper printouts, jellyroll ink, cardstock, cardboard, glue, tape, collaboration


Materials: paper printouts, jellyroll ink, cardstock, cardboard, glue, tape, collaboration

sans photo edit


Day 28
Ask someone to teach you something new.

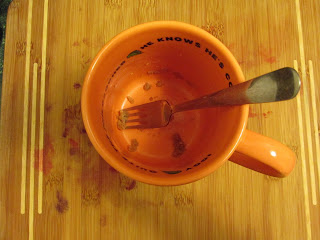
Air Potato Leaf Beetle Vanilla Mug Cake
My friend AC was gracious enough to teach me something she had learned to make just minutes before! A mug cake...something I had never heard of. This is the one I made. The beetle decoration is made from a strawberry, blueberry, and mint stems & leaves.
For something that came out of the microwave, it wasn't too bad, and I really appreciated the idea.
Definitely something different.
I asked AC how hers turned out "..it was okay, not quite a Publix cake, but okay."
I agree.
But I suppose if I need a fast sugar fix I know what to do.
But I suppose if I need a fast sugar fix I know what to do.

Gone! (except for the berry stains on the cutting board...those'll stick around a while)
Day 29
Ask someone to start something for you to finish.

I  Bugs
Bugs
Bugs
For the "illusion" to work, you have to imagine this Cercropia moth is actually Mothra (and perhaps you're about to become the latest casualty). It's like when you "squish" someone's head between your fingers (but everyone loves Mothra, so no squishing).

AC supplied me with this lovely sketch of hands that she had done and told me to put a bug on it.
I printed it out from her scanned copy.

I then drew this moth separately.

A light box was used to combine the drawings and I finished it with colored pencils.
Day 30 (Made it!)
Make a trophy and award it to yourself.

The Golden Mantispid Lifetime Achievement Award for Excellence in Creative Sprintery
I humbly accept.
This is the final #CreativeSprint project, and I thought what better way to end it than with the same insect I started with? This pose (which I've seen on the interwebs) seemed a perfectly triumphant fit for a trophy.

I sketched the mantispid and then traced and colored it onto shrink plastic.

It took some minor engineering to glue it on the wood bead.
(And there's the first mantispid in the background)
Materials: shrink plastic, colored pencils, brown micron pen, gold ink, wood bead, paperboard, Bristol paper, glue

THE END

I was able to keep everything bug-themed and I didn't spend a dime!
Stats - how many projects featured:
2 Mantispids 1 snakefly
1 antlion 1 green lacewing
4 mantids 11 beetles
1 cricket 1 dragonfly
1 damselfly 2 moths
3 butterflies 2 bee flies
1 cockroach 1 cicada
2 wasps 1 bee
1 stinkbug 1 kissing bug
3 paperclay 8 ink
6 acrylic paint 5 pencil only/colored pencils
2 watercolor 4 natural stuff
2 food 2 plastic
4 wood 2 toothpicks
2 money 17 paper (including cardboard etc)
6 printouts 1 cloth
1 ceramic 3 wire
5 string (any) 12 glue
9 the kindness of others
I love how you blogged on your creative sprint journey. It was fun to read it all the way through (as if I went along for the ride). Mines were kind of all over the place, some on facebook, some on twitter and some on my blog but none all in one place. I may go back and dedicate a page. I also am interested in trying some of your techniques. They look like fun, particularly the paper clay, shrink plastic and book. Thank you for sharing.
ReplyDeleteThanks! If you do make a page, please post the link!
ReplyDeleteCan I have the break a rule one??? Love you, Mom
ReplyDelete